
 Français
 Español
 Deutsch
Installation du Calorstat et de sa Tringlerie pour Volkswagen - Guide Complet
Installation of the Thermostat and Linkage on Volkswagen Engine
Many Beetle (VW) owners choose to drive without flaps in the fan shroud or without the thermostat system. While this may be fine for occasional summer use, it can cause various problems in daily use, such as:
- The engine takes longer to warm up, which hinders optimal lubrication.
- The automatic choke doesn't work properly because the engine doesn't heat up as quickly as expected.
- The cabin heating becomes inefficient, making defogging difficult.
Step 1: Important Notes Before You Start
Do not attempt to reinstall the flaps without removing the engine from the vehicle.
It is essential to note that "German" thermostats (with large red springs) expand when they break, keeping the flaps open. In contrast, Mexican thermostats can get stuck in the closed position, causing overheating.


Comparison between a Mexican thermostat and a German thermostat.
Step 2: Required Materials
To install the thermostat and linkage, you will need the following parts:
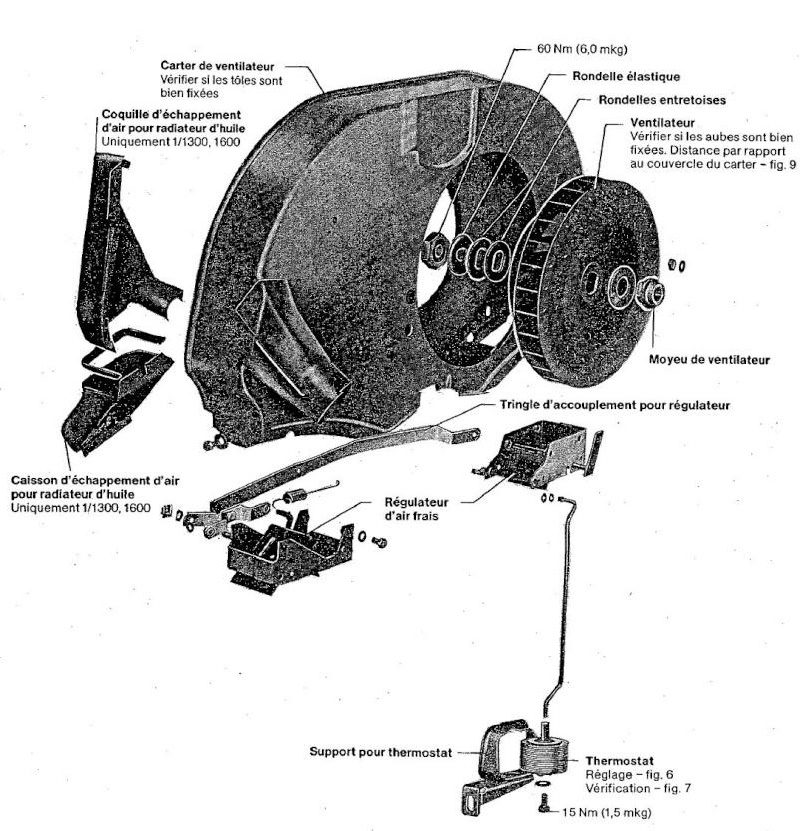
- Fan Shroud Flaps
- Linkage
- Thermostat (German or Mexican)
- Support Bracket
- Return Spring

Example of linkage for thermostat installation.
Step 3: Disassembly and Preparation
If you found your flaps on a non-doghouse shroud, here's how to adapt them:
- Disassemble the connecting rod and the specific part (13).
- Then install the connecting plates (28) on your flaps.
- Use quality circlips to ensure everything stays securely in place while driving.

Original VW circlips used to secure the flaps.
Step 4: Installation of the Flaps and Linkage
Once the flaps and plates are in place, you need to install the linkage:
- Place the flaps in the doghouse shroud, ensuring the support for part 13 is on the side of cylinders 1 and 2.
- Check that the flaps open and close correctly. If your parts are too worn, it may prevent the system from functioning properly.

Flaps installed in a doghouse shroud.
Step 5: Installing the Thermostat
Once the linkage is in place, install the thermostat:
- Screw the thermostat onto the connecting rod.
- Loosen the fastening nut on the thermostat bracket.
- Press the air flaps to open them. Move the thermostat bracket down in its slot until the upper arm of the bracket touches the top of the thermostat. The flaps and thermostat are now in a simulated hot engine position. Fig. 17 shows the position.
- Tighten the bracket nut.
- Move the thermostat up or down to test the flaps' operation.
- When closing the flaps, tighten the bolt that secures the thermostat to the lower arm of the bracket.
-
Fig. 17. The thermostat bracket moves (arrows) in the slot for adjusting the thermostat and air flaps. The indicated position simulates a hot engine with the flaps open. Pulling the thermostat down to the lower arm of the bracket closes the flaps. See the text for details.


Installed thermostat and connected linkage.
Step 6: Final Check
Before closing the system, check that:
- The flaps open and close correctly by manually operating part 13.
- The thermostat functions properly and doesn't rub against other components.
Do not test your "German" thermostat with a heat gun, as you risk breaking it if the temperature exceeds 120°C.

Final system test once the thermostat is installed.
Warning
Once the system is installed and tested, take a few short drives around the block to ensure everything is functioning correctly before hitting the road.
This will allow you to detect any potential problems before damaging your engine.

We ship worldwide