
 Français
 Español
 Deutsch

We ship worldwide
Fitting a Vertical Seat Belt Retractor
Securon — Vertical Retractor Fitting
▶ Introduction & Compatibility
This guide describes the complete fitting procedure for a seat belt equipped with an automatic vertical retractor (automatic reel), in accordance with the official Securon instructions for the aftermarket. This type of kit is designed for installation on classic or period vehicles that do not have original seat belts, or for replacing a deteriorated belt.
Typical applications include Volkswagen Beetle, Golf Mk1/Mk2, Karmann Ghia, Type 3, as well as Porsche 911 (G-series and earlier), and more generally any vehicle fitted with approved anchorage points in the body. Refer to the Securon application sheets by make and model to identify the exact kit suited to the vehicle in question.
The system comprises: an automatic winding retractor housing, a diagonal and lap belt, an upper bracket guide, a buckle with stalk, and the full hardware set (bolts, washers, nuts).
⚠ Safety Warnings Critical
The retractor MUST be mounted strictly vertically, as shown in Fig. A. Any tilted or horizontal installation will disrupt or disable the inertial locking mechanism, rendering the belt ineffective in the event of an impact.
Before any installation, verify that each anchorage point in the body is free from perforating corrosion, cracking, or deformation. A degraded anchor cannot withstand the loads generated during a collision.
After any significant impact, the entire belt assembly (retractor, webbing, buckle) must be replaced without exception and the anchorage points in the body must be inspected.
The belt is designed for one occupant at a time. It must never be worn around a child sitting on an adult's lap.
These instructions must be passed on to the vehicle owner and/or driver at the time of handover after installation.
▶ Official Technical Diagrams
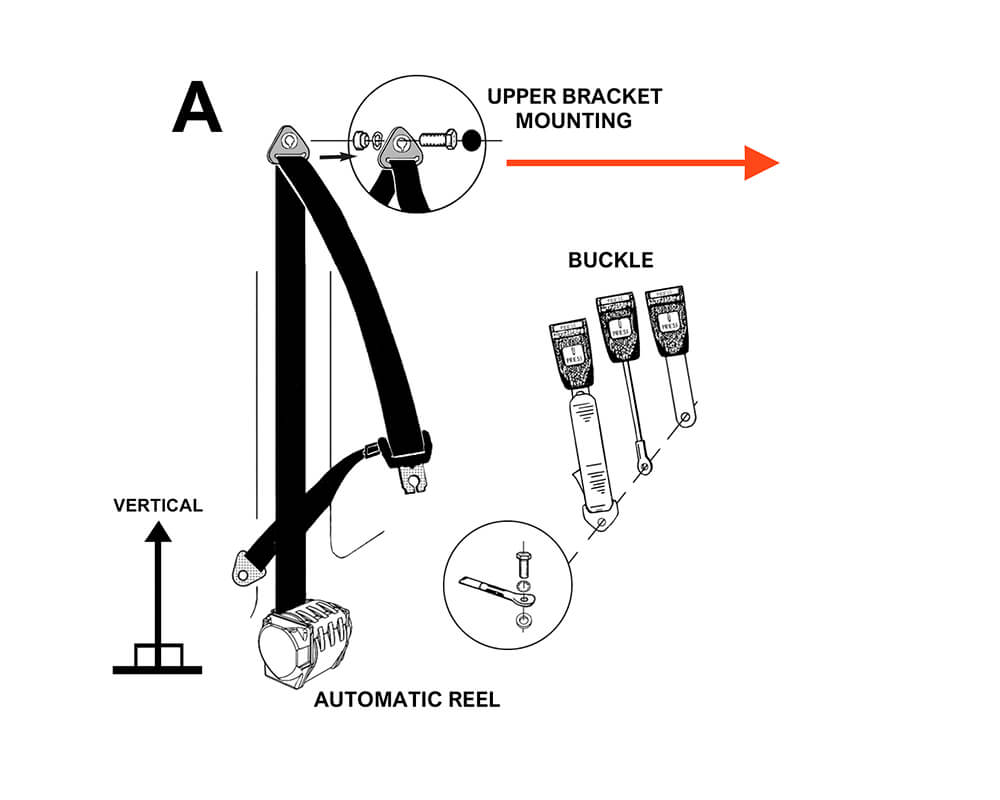
Fig. A — General layout.
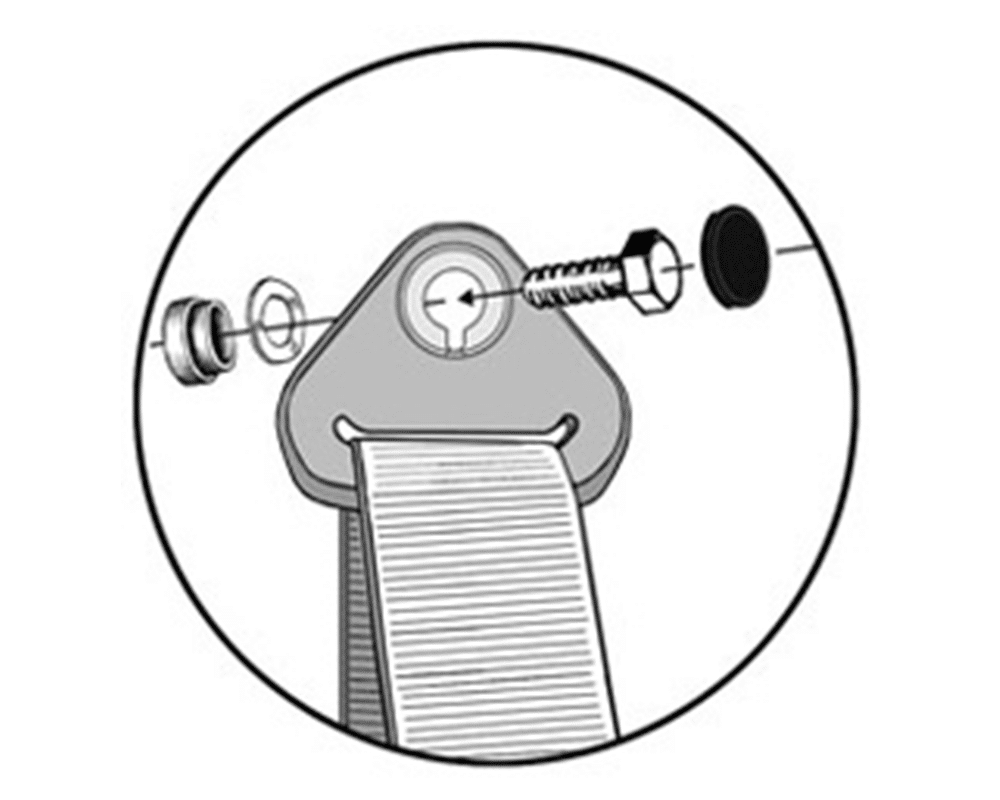
Housing fixing detail.
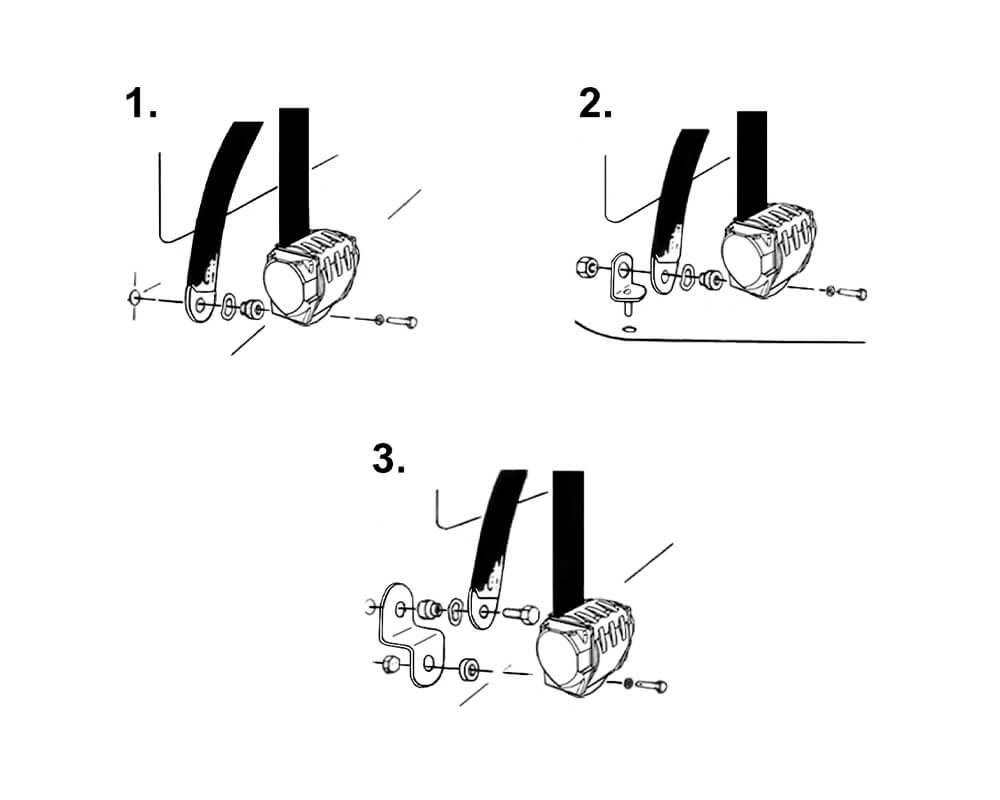
Anchorage configurations 1 / 2 / 3.
⚙ Installation Procedure
-
Identify and inspect the anchorage points in the body
Locate the three vehicle anchorage points: upper anchorage (B-pillar or door pillar at shoulder height), floor anchorage for the retractor housing, and floor anchorage for the buckle stalk. Fig. A shows a typical layout. Inspect each point: intact thread, sound metalwork, no structural corrosion.
-
Select the fixing configuration (diagrams 1, 2, or 3)
Depending on the accessibility and geometry of the floor, choose the appropriate anchorage configuration from the three available (see image 3 above): direct fixing (1), intermediate plate (2), or double-angle bracket (3). Use exclusively the hardware supplied in the kit.
-
Mount the retractor housing⚠ Critical — vertical mounting mandatory
Position the retractor housing at its floor anchorage point. The housing must be strictly vertical (spool axis horizontal, webbing exit pointing upward). Use a spirit level if necessary. Insert the central bolt with its washers in the order shown on the exploded diagram (image 2): body-side washer → housing → clamping washer → nut. Do not torque to final specification at this stage.
-
Install the upper guide (Upper Bracket Mounting)
Fix the webbing guide to the B-pillar or designated upper anchorage. The height must be adjusted so that the diagonal strap passes over the centre of the shoulder. Fit the bracket hardware in accordance with Fig. A. Do not torque to final specification at this stage.
-
Install the buckle on its stalk
Fix the buckle to its floor anchorage point. If the stalk is a flexible cable type, it may be routed around obstacles, but observe the following constraint:
⚠ No-bend zone — 80 mmNever bend the stalk at a sharp angle, nor within 80 mm of the fixing hole. A sharp bend weakens the internal cable and may cause rupture under load.
-
Check buckle position with occupant seated
Seat an occupant in the normal driving position and buckle the belt. The buckle must rest on the hip or just below. Adjust the stalk length or routing if necessary, then torque all bolts to final specification.
-
Check webbing routing — no twist, no chafing
Verify that the webbing follows a straight, unobstructed path from the retractor to the upper guide and across the shoulder, without any twist or contact with a sharp edge. Final torque all anchorage points.
⚠ Belt alterations or additionsAny modification to the kit (webbing extension, non-approved accessory, etc.) is prohibited. In case of doubt, contact Securon directly.
✓ Post-Installation Checks
Vehicle stationary, belt buckled: pull sharply on the webbing. The retractor must lock immediately and prevent any further extension. If the retractor does not lock, do not use the vehicle. Check the vertical orientation of the housing.
Complete checklist before first use:
- Retractor mounted strictly vertical (spirit level checked)
- All bolts torqued to final specification
- Webbing free from twist along its entire length
- Webbing not chafing on any sheet metal edge
- Buckle positioned on the hip (occupant seated)
▶ Usage Instructions
Buckling: insert the tongue into the buckle until a clear, positive click is heard, confirming the belt is engaged.
Unbuckling: press the buckle release button — the tongue is automatically ejected.
Correct fit & adjustment
The diagonal strap must pass over the centre of the shoulder and the buckle must rest on the hip or just below. No excessive slack should be present in the belt during use.
- Avoid any webbing twist during use. A twist reduces the effective strength of the belt by concentrating loads on a narrow section.
- Do not allow the webbing to chafe on a sharp edge (door sill, trim cutout, exposed hardware). If chafing occurs regularly, protect the edge or reroute the webbing.
- Single occupant use only: never share a belt between two people, and never wrap the belt around a child on an adult's lap.
- Children: the belt can retain most approved child seats and boosters, but is not intended for direct use by children without an appropriate, approved restraint device.
- No modifications: do not add, shorten, or alter the belt or any of its components. In case of doubt, contact the Securon manufacturer.
⚙ Maintenance & Periodic Inspection
Regular maintenance determines the long-term reliability of the belt. It does not require disassembly: in most cases, a full visual and functional inspection is sufficient.
Inspect the complete belt assembly and anchorage points at regular intervals. Securon does not specify a fixed interval — an annual check or inspection at every vehicle service is considered good practice.
Webbing cleaning:
- Use only warm soapy water (mild soap).
- Prohibited products: chemical cleaners, bleach, dyes, petrol, grease, acid. Any contamination by these substances degrades the fibres and requires immediate replacement of the webbing.
- Allow to dry naturally, away from direct heat and sunlight.
Immediate replacement criteria:
- Webbing that is cut, frayed, abraded, or showing visible wear zones.
- Webbing that has sustained an impact or violent tension load (even without visible damage).
- Buckle that no longer produces a clear click on engagement, or releases the tongue involuntarily.
- Retractor that no longer locks during a sharp pull.
- Retractor that no longer allows the webbing to pay out freely (spool jammed).
- Visible corrosion on the retractor housing, buckle, or anchorage points.
After any collision (even minor), replace the complete belt assembly and inspect the body anchorage points, even if no damage is visible.
◆ Conclusion
The correct installation of a Securon vertical retractor depends on two absolute requirements: the strictly vertical orientation of the housing and the structural integrity of the body anchorage points. These two conditions must be verified before the vehicle is put back into service.
Once correctly fitted, the belt provides reliable automatic inertial restraint, provided it is used unmodified and inspected periodically. In case of any doubt regarding condition or function, replace the assembly without delay.
These instructions must be passed on to the vehicle driver. Official source: Securon — Vertical Retractor Fitting (IA4).


